XMPP Cluster
This document describes the new architecture and procedures needed to maintain and work with the new XMPP cluster.
Architectural design
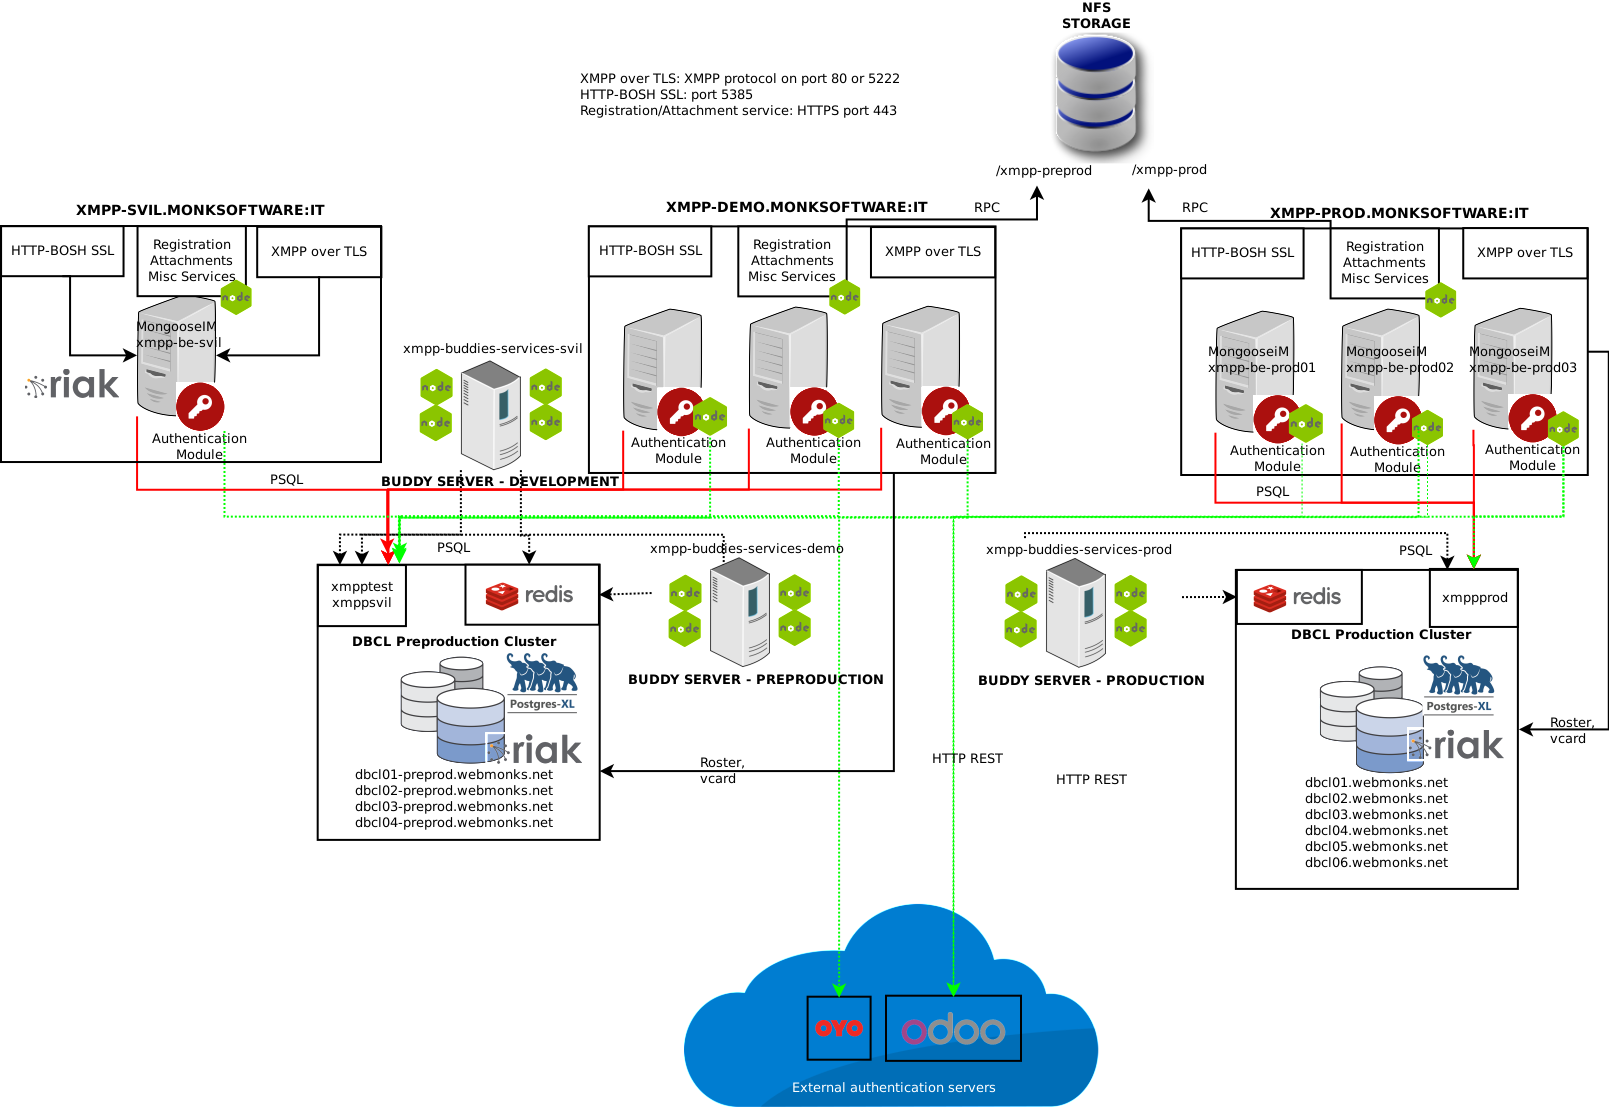
The new MongooseIM cluster (MongooseIM Version: 2.1.0) runs on three separate environments, and it’s comprised ot various layers that interact together to provide a complete XMPP solution, covering HTTP registration, HTTP BOSH for web integration, XMPP streaming services, HTTP avatar/files upload, custom authentication, TLSv1.2 compliance, all built on top of a distributed database environment running on a postgres-XL database cluster. Also, a RIAK cluster has recently been added to the pack, providing distributed and blazing-fast roster and vcard services. Mongoose is using RIAK to store persistent data only for these two services, but in the near future it could use it also for MAM.
Provided you have a public RSA key and asked for a developer account, all servers are reachable via SSH using your surname as account and RSA public key, to check logs, do maintenance, etc. Please notice that production servers are only available to OTP-enabled accounts.
The available environments are:
Environment |
Public address |
Private servers |
|---|---|---|
Production (cluster mode) |
xmpp-prod.monksoftware.it |
xmpp-be-prod01 xmpp-be-prod02 xmpp-be-prod03 xmpp-be-prod04 |
Preproduction (cluster mode) |
xmpp-demo.monksoftware.it |
xmpp-be-preprod01 xmpp-be-preprod02 xmpp-be-preprod03 |
Dev/Testing (single server mode) |
xmpp-svil.monksoftware.it |
xmpp-be-svil |
..important:: Remember that if you are in the AppCluster network (e.g. you have an eth1 that is in the 172.16.0.0/12 network), you could always reach the xmpp service by using the “internal” name, that is: the same “Public address” name, with “monksoftware.it” removed (example: xmpp-prod, xmpp-demo, xmpp-svil). In this way, you can enjoy a 10Gps and more reliable connection.
All XMPP services are reachable on port 80 with TLSv1.2 layer, and all the services are running as mongooseim user. If you asked for a mongooseIM developer account, only on Development / Testing environment you can, after you’ve logged in, become mongooseim user and work directly with configuration anred MongooseIM service by running the command:
sudo -u mongooseim -i
The XMPP servers provide various types of services, each listening on a different port. Following the list of services. All the ports are the same in all the environments.
XMPP |
80 / XMPP with TLS streaming |
5222 / XMPP with TLS streaming |
|
HTTP-BOSH |
5380 / BOSH Firewalled use HTTPS below |
HTTPS-BOSH |
5385 / BOSH over TLS |
HTTPS Registration and Custom services |
443 / HTTP over TLS |
[PRIVATE SERVICE] Authentication Module |
127.0.0.1:3300, not reachable from outside |
XMPP endpoints
All the XMPP endpoints offer TLS capability. You have to activate TLS in your XMPP client in order to have a secure connection to MongooseIM. The SSL certs are provided by Letsencrypt, and are renewed every once in a while (check appropriate paragraph below). The very same certs are used to provide TLS layer on all the HTTPS services.
You can find all the certificates files in /etc/mongooseim:
xmpp-environment.monksoftware.it.cer[public cert – if you want to do certificate pinning, this is what you need]xmpp-environment.monksoftware.it.key[private key]fullchain_key.pem[combo of the two above, used for MongooseIM]ca.cer[Let’s Encrypt certification authority]
HTTP BOSH services
Both HTTP and HTTPS BOSH is available, but, for security reasons, just HTTPS BOSH is opened on the firewall. Should you require the 5380 port being opened, ask the current system administrator.
The BOSH services are provided using the same TLS certificates as above. The Let’sEncyrpt authority should be recognized by all current browsers. Should your application not recognize the TLS certificate, please import the certification authority ca.cer, referenced above, in your application keystore, and try again.
The available endpoints for BOSH are:
/http-bindformod_bosh/ws-xmppformod_websockets
Should you need for any reason static files provided by MongooseIM, please ask the current system administrator.
HTTPS utility services (NodeJS)
GIT Repository for project:
git@git.webmonks.org:monktalk/http-services-module.git
Running directory for project: /usr/lib/mongooseim/node/source
Running on port: 443 (internal nat to port 3000) over TLS
The HTTPS utility services are a revamp of the old HTTP registration module,
stripped down of the registration features. Being a NodeJS service,
it runs using pm2. Presently, for security reasons you can’t
use pm2 as a deploy system directly for the module, but you can git push
and then, on the development server, use git pull and pm2 restart in order
to refresh the module. In cluster services (production and preproduction),
all media are saved on a NFS shared filesystem,
hosted in the nfs-storage service in the MONK infrastructure.
This means that every media that is uploaded through the HTTPS public services
is instantly available to all cluster nodes. Presently the available space is
2TB: should you need more space, ask your current BOFH.
The NodeJS module runs on SSL by itself.
The certs are located in basedir/ssl and are symbolic links
pointing to /etc/mongooseim
ca.crt->/etc/mongooseim/ca.cerserver.crt->/etc/mongooseim/xmpp-environment.monksoftware.it.cerserver.key->/etc/mongooseim/xmpp-environment.monksoftware.it.key
The symbolic links are dynamically created on each of the environments, by the ecosystem.js deploy feature of pm2. For now you can’t deploy directly to the server but your BOFH is working for it. These are the endpoints provided by the utility service:
/api/v1/attachments/pictures |
POST |
Attachments |
All the attachment services must be used with the following parameters For POST requests:
For GET requests:
|
/api/v1/attachments/pictures/:filename |
GET |
||
/api/v1/attachments/avatars |
POST |
||
/api/v1/attachments/avatars/:filename |
GET |
||
/api/v1/attachments/avatars/thumbnails/:filename |
|||
/api/v1/attachments/gravatar |
GET |
||
/api/v1/attachments/gravatar/thumbnails/:filename |
|||
/api/v1/attachments/videos |
GET |
||
/api/v1/attachments/videos/:filename |
|||
/api/v1/notifications/store_token |
POST |
Tokens Storage |
|
/api/v1/notifications/delete_token |
|||
/api/v1/notifications/delete_all_tokens |
|||
/api/v1/notifications/send |
POST |
Send push notification |
|
/api/v1/notifications/reset_badge |
POST |
Reset Badge |
|
/api/v1/notifications/channel_subscribe |
POST |
Channel subscriptions |
|
/api/v1/notifications/channel_unsubscribe |
|||
/replies |
POST |
||
/resolves |
|||
/api/v1/users |
POST |
User Creation |
Body element with parameters:
|
/api/v1/locations |
POST |
Location Data |
Location body element with parameters:
|
/api/v1/users/authorize |
POST |
User Authorization |
|
/api/v1/minimum_app_version |
GET |
App Version |
Returns the minimum app version required |
/credit-transfers/outcome |
POST |
Wind Specific Services |
Currently not used |
/mobile-ticketing/mt |
|||
/get_password |
|||
/check_password |
|||
/user_exists |
Authentication service (private NodeJS)
GIT Repository for project: git@git.webmonks.org:monktalk/authentication-module.git
Running directory for project: /usr/lib/mongooseim/node_priv/source
Running on port: 127.0.0.1:3000
The new authentication service is called internal by MongooseIM and it is not available to public.
The internal authentication service, if successful, returns a 200 status code
with body equal to the username. The auth method is configured in
/etc/mongooseim/ejabberd.cfg,
parameters: auth_method and auth_opts where you can specify the
password format and endpoint with the host parameter.
The path_prefix must be configured as /authorize/ on mongooseim:
{auth_method, http }.
{auth_opts, [
{password_format, plain},
{scram_iterations, 4096},
{host, "http://127.0.0.1:3300"},
{basic_auth, "user:password"},
{path_prefix, "/authorize/"}
The new authentication module uses the “web_users” table on the DBCL of the appropriate environment. Please check the paragraph DATA MODEL for additional details.
Buddy servers
The buddy servers run on TotalJS platform, on dedicated servers. Below you will find the addresses for administration consoles and private addresses to login in via SSH.
Environment |
Public address |
Private servers |
|---|---|---|
Production |
xmpp-buddies-services-prod |
|
Demo |
xmpp-buddies-services-demo |
|
Development |
xmpp-buddies-services-svil |
You can manage them via the WEB HTTPS interface
using the credentials: administrator/xxxxxxxxxx!
Just for development environment.
For preproduction/production environment, ask the current BOFH.
Notice that you can always login to the appropriate environment and have read-only access using ssh <hostname-without-domain> while you are in the VPN: you will find the TotalJS buddies logs in /www/logs.
Some developers also get to become the user “node” on the development environment, letting them to modify read/write the files! If you got permission, try and type
:: code-block:: sh
sudo -u node -i
You can add a new buddy by using the TotalJS interface.
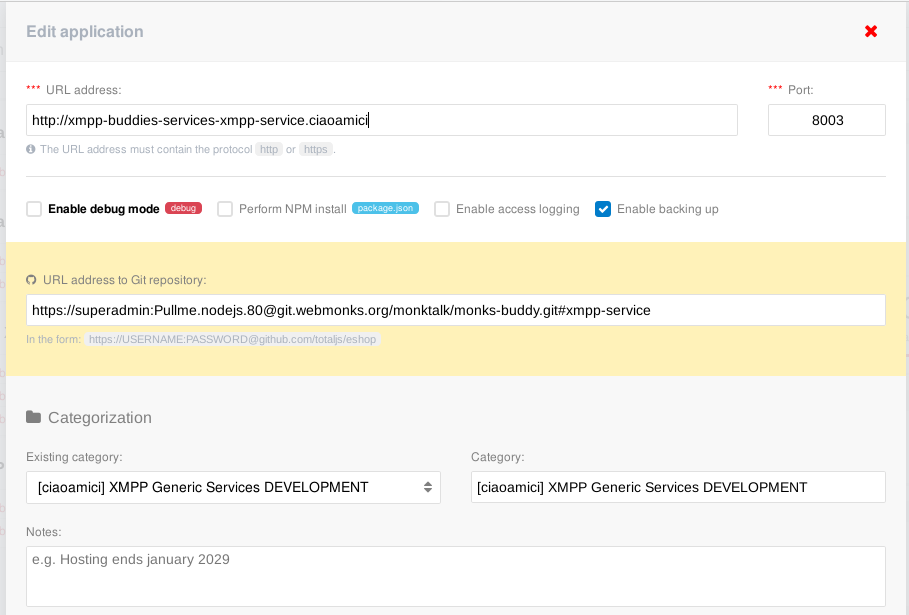
Using the (+) button, you can add a new buddy by simply specifying the GIT URL of the repository, adding the branch for the repo to fetch by using the hashtag suffix (ex. The above URL would fetch the xmpp-service branch of the monks-buddy repo).
In order to let TotalJS see the GIT repository, you should login on GITLAB and
add the superadmin TotalJS user as a developer to the project.
The user and password for git pull must be as specified above:
superadmin:Pullme.nodejs.80, with https protocol.
The nomenclature to use for the URL address, if you do not need the service to be available to public, is:
http://xmpp-buddies-<typeofservice>-<buddyname>.<domain>
Where typeofservice can be orchestrator, services (for XMPP service),
the buddyname is of course the name of your buddy,
and the domain is the XMPP domain where the buddy is going to be run.
This is just a convention in order to see the integration log
in the distributed logging environment.
If your buddy also exposes a HTTPS service, you can use https://fqdn, and the TotalJS interface with automatically fetch and renew SSL certificates for you by using the Letsencrypt service. Bear in mind you must register the FQDN on Amazon DNS services first (ask your system administrator). After you have registered your buddy, you have to pull it on the server, by using the “Download from Git” type of pulling in the menu that appears. You can change this later by using “Upload ZIP” menu from the service menu using the hamburgher button on the appropriate row.

The lens icon is used to check the logs for the service: the “reload” icon will
reload the application, while the hamburgher icon lets you change settings.
In order to use TotalJS features, you should develop your environment using
TotalJS library. If your service uses a different library, you can use
the custom start script input to enter a custom script that will
launch your application. By convention, it’s safe to use bin/index.js,
and use the file browser in the “Settings” entry in the hamburgher menu
to launch your service.
Here is an example:
const options = {};
options.ip = '0.0.0.0';
options.port = parseInt(process.argv[2]);
options.config = { name: 'event-orc-ciamic' }; // <------ Very important. Will let you identify the process. See below.

process.env.NODE_ENV = 'development';  // ← ---- Use it to specify which configuration level to use

const clientName = "event-buddies";

console.log(`Starting Monk Message Orchestrator for ${clientName} module..`);

const MonkMO = require('../app.js');
const ActionsManager = require('../apps/');
let monkMO = new MonkMO(clientName);

require('total.js').http('release', options);

// require('total.js').cluster.http(5, 'release', options);  // ← ------ If you need cluster mode, you can start it this way
The process name configured above will create a process named “total: event-orc-ciamic”, because the process is built and startup by totalJS. Should you use express, for example, remember to do something in order that the process name will contain “total: xxxx”, otherwise bad things will happen (multiple restarts, ports already in use, etc).
Then, create a config.json in the config directory.
Of course every buddy or orchestrator will have different configuration. Refer
to the documentation of each buddy for additional details.
Please bear in mind that TotalJS pulls data from GIT, then copies it in the
running directory.
This means that if you delete some files from the git repository, even if you make a “Upload ZIP → Download fromGIT” to update your code, the old files will stay in place, and you should manually delete them (or use the Remove files in application directory, switch when updating the code, but remember to backup your custom-added files first, such as config.json and bin/index.js if you have created them.
You should create buddies for each of the domain you are going to serve. Remember that the buddy authenticates as user, so you have to manually create its credentials in the appropriate DBCL and DB for your current environment (see DATA MODEL and STANDARD PROCEDURES).
Logging
At the time of the writing of the present document, the logging is centralized on the “storage” server for all of the environments. On the syslog centralized service, the following files are created:
/var/log/xmpp/xmpp-be-prod(merging XMPP logs from all production servers)/var/log/xmpp/xmpp-be-preprod(merging XMPP logs from all preproduction servers)/var/log/xmpp/xmpp-be-svil(fetching logs from single development server)
The xmpp-be-svil is also logged to the development service, xmpp-be-svil, in the
file:
- /var/log/mongooseim/ejabberd.log
To ease debugging for developers.
The NodeJS services logs, for Authentication Module, Http Services, and Join Proxy, only for demo and production environment, are available in the following files, located on the storage.webmonks.net centralized logging service:
/var/log/xmpp/xmpp-be-<environment>-auth/var/log/xmpp/xmpp-be-<environment>-httpsrv/var/log/xmpp/xmpp-be-<environment>-joinproxy
The Buddy service logs are available using the lens icon on the buddy server connected on the environment: use the table above to get the correct URL address.
We are planning to integrate them on the logging server soon.
Maintenance and standard procedures
Adding a domain
In order to add a domain to mongooseIM, add the domain to the list of domains in /etc/mongooseim/ejabberd.cfg, in the parameter “hosts”, then restart the mongooseim service using:
Development:
mongooseimctl reload_localProduction/Demo: copy the
ejabberd.cfgon all the other servers, then runmongooseimctl reload_cluster
Then, in each of the XMPP servers, create the domain auth file in
/usr/lib/mongooseim/node_priv/current/externals-auth/. The domain auth file
must be named exactly as the domain, plus the suffix .js. Then you can run
pm2 restart <authentication module ID> to make the NodeJS server see the
changes.
Please bear in mind that each XMPP domain must have its own buddies. You should then add the appropriate buddies on the domain, and create the authentication data in the web_users table in the appropriate environment (check data model below)
..tip:: If you have some backend authentication service for a domain, and you would like to
have a buddy for that domain which is not on the backend, you can add a configuration like
the following, in the AuthenticationModule configuration file ~/node_priv/current/config/config.json:
{
  "buddies": {
   "liam": [ "xmpp_service", "zabbix" ],
   "wendy": [ ]
  }
}
Here we defined, in the preproduction environment, two buddies named xmpp_service and zabbix in the “liam” domain. This allows us to login those two without checking on the backend. You should, of course, handle this exception in your externals-auth module. Here is how it’s done in the liam.js external authenticator:
const buddies = require ('../config/config')[env].buddies["liam"];
 static getUserByName(user, domain, done)
  {
  let odooUsername = user.replace('#', '@');
  // Return 200 OK if user_exists is being called for a buddy
  if(buddies.indexOf(odooUsername) != -1) {
     console.log("user_exists called on buddy " + odooUsername + " returning 200");
     return done(null, {
         status: '200',
         response: 'User authorized',
         datetime: Date.now(),
         body: odooUsername
     });
You should implement something that’s not dangerous - i.e., maybe check in the WebUsers model for the password. See section below.
Creating user creds manually (e.g. for buddies)
Log in the DBCL DB using the right credentials for your environment, connect to the right database , then run the command:
insert into web_users (node, token, domain) values ('<username>’, '<password>', '<domain>');
Data model
The data model for MongooseIM is rather complex and we are not going to explain it here. In fact, there is plenty of documentation available for MongooseIM in http://mongooseim.readthedocs.io/en/latest/
And for documentation about the DBCL technology, which presently runs on postgres-XL cluster, you can find a lot of information here: https://www.postgres-xl.org/
The most meaningful addition in postgres-XL, for a developer, is of course the DISTRIBUTION BY
clause of the ALTER TABLE command. Using the ALTER TABLE DISTRIBUTE BY <criterion> when
you create a table, for example for a new buddy, you can decide how data is going to be distributed
on all the datanodes of the XL cluster. There are presently four ways of data distribution:
REPLICATION
Which means that ALL data is going to be replicated on all nodes, and, should a node fail, your data will keep being available to queries. This is the safest choice if you do not have much data to keep on the table, or you’re just not interested
HASH<column>
With HASH, you can distribute data evenly by a hash of the primary key of the table.
MODULO<column>
with MODULO, you can distribute by the MODULO of the column (good for integer or bools)
ROUNDROBIN
Each row will be placed on each datanode in a RR manner, that is, every first row in the 1st cluster node, every second row in the 2nd, and so on.
Database |
Table |
Purpose |
|
|---|---|---|---|
Test: xmpptest |
dbcl-preprod |
web_users |
User authentication for each of the configured domains that are authenticating on it. Not used by all domains, it depends on how it is configured. |
Dev: xmppsvil |
|||
Prod: xmppprod |
dbcl |
Environment |
Database |
Purpose |
|---|---|---|
Preproduction |
xmpptest |
Authorization |
SSL renewal
The SSL certificates renewal is done every night ad 00:26, using the “acme.sh” script by the “root” user. The Acme.sh script employs the Amazon DNS API (using the DNS_AWS extension and account AKIAJF6ENDUVUICA6PYA, configured on Route53 Amazon console) in order to issue and renew SSL certificates for all the XMPP services specified above.